Want to live stream but don’t know how to get started? ITS OK! We (current streamers) all had to figure this stuff out too.
We’ve boiled it down into 10 steps!
- Download OBS
- Connect Audio Device to Computer
- Add Audio Device as Source in OBS
- Connect Video Device to Computer
- Add Video Device as Source in OBS
- Test Audio/Video (optional)
- Sync Audio (highly recommended)
- Create Twitch Account
- Connect OBS to Twitch
- Start Streaming
- Streaming service (Twitch (cool) or YouTube (not as cool))
- Encoder (OBS – open broadcasting service) https://obsproject.com/
- Video source (camera or phone)
- Audio source (USB microphone or audio mixer)
1. Download OBS
https://obsproject.com/
Open Broadcasting Software is an encoding software that will take your audio and video inputs, and encode them into a live stream friendly signal (RTMP). Simply setting a good camera and mic as your inputs directly in Twitch or YouTube can still result in a poor quality stream for your viewers. This is how the “pros” do it 😉
Once installed, open OBS.
2. Connect audio device to computer
You have to plug something into your computer’s USB in order to pick up sound.
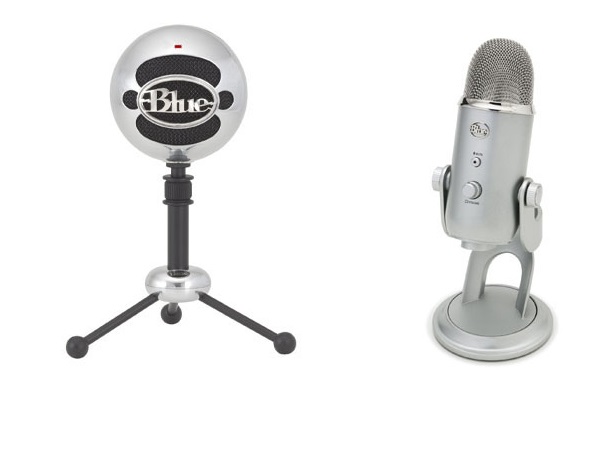
Microphone: USB Mic’s are friendly to just plugin directly to your laptop USB port. Like:
Yeti Blue
Yeti Snowball
These are great if you are doing an acoustic show and want little to no fuss with how to get a clean sound signal.
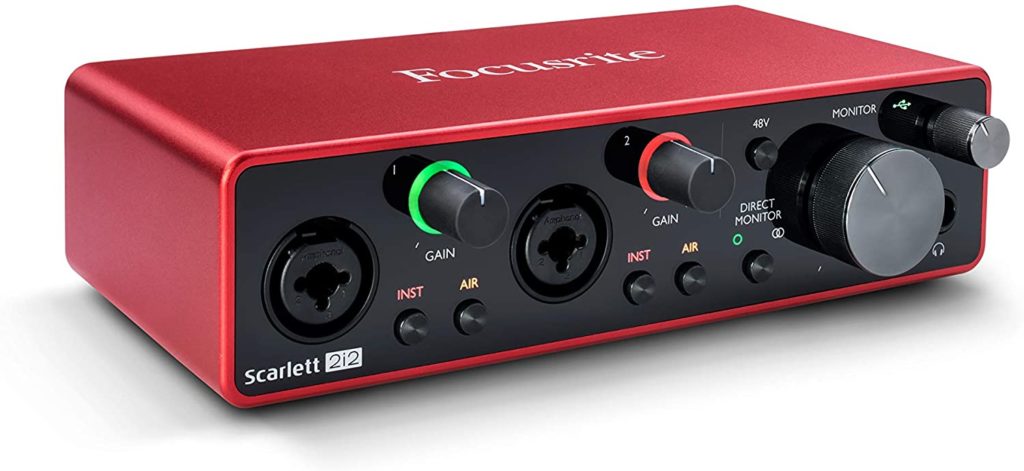
Audio Interface: You can use a USB Audio interface like:
Focusrite Scarlett
BEHRINGER, 12 Mixer
These are handy if you plan to plugin multiple audio sources, like a “normal” microphone with an XLR cable and/or a direct instrument input with a music cable.
Also recommended if you have are playing an electric instrument(s) or have electronic instruments like midi keyboards and even analog DJ equipment. These take analog signal and convert them into digital, which can then, be plugged into your USB port, or USB adapter… #connectedness
Protip: if you have a new Macbook, you may need to buy one or two USB-A (old) to USB-C (new) adapter since most devices plug into old USB types and you’re laptop is too cool for that and might only has USB-C ports.
Insignia™ – USB Type-C-to-A Adapter
Apple – USB Type-C-to-A Adapter

3. Add your audio device as an Audio Source in OBS
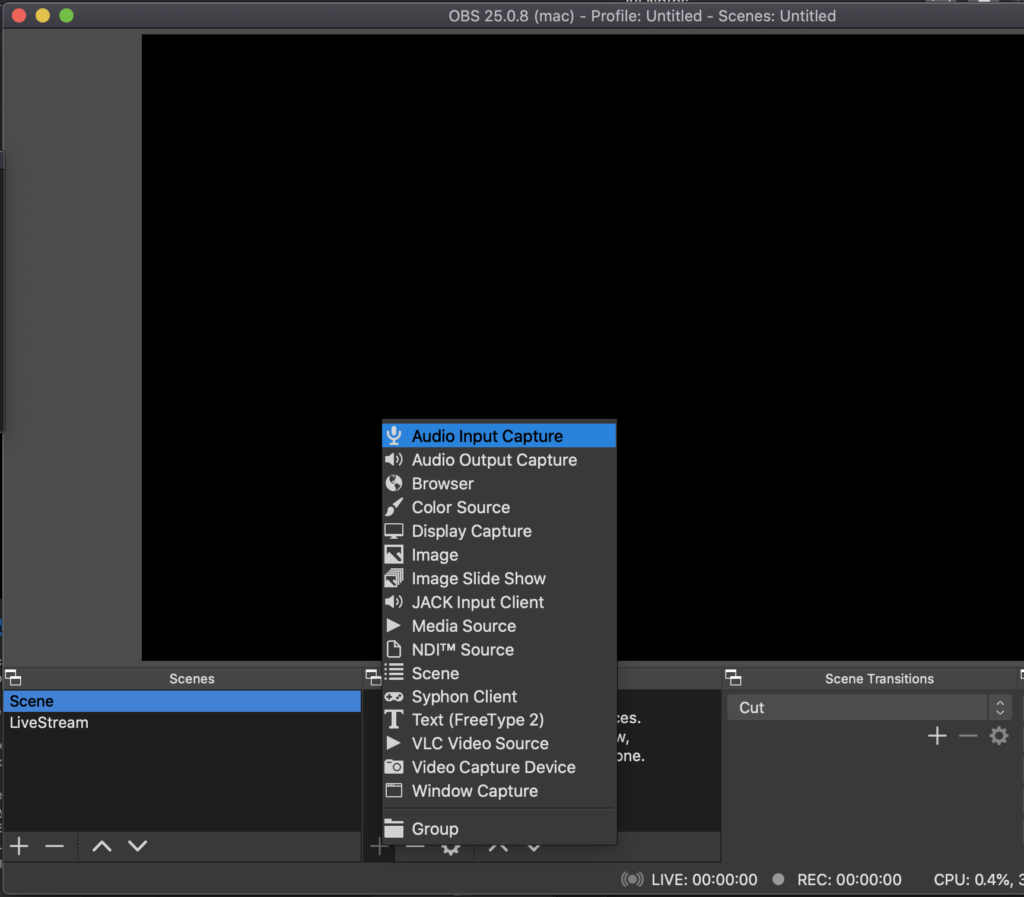
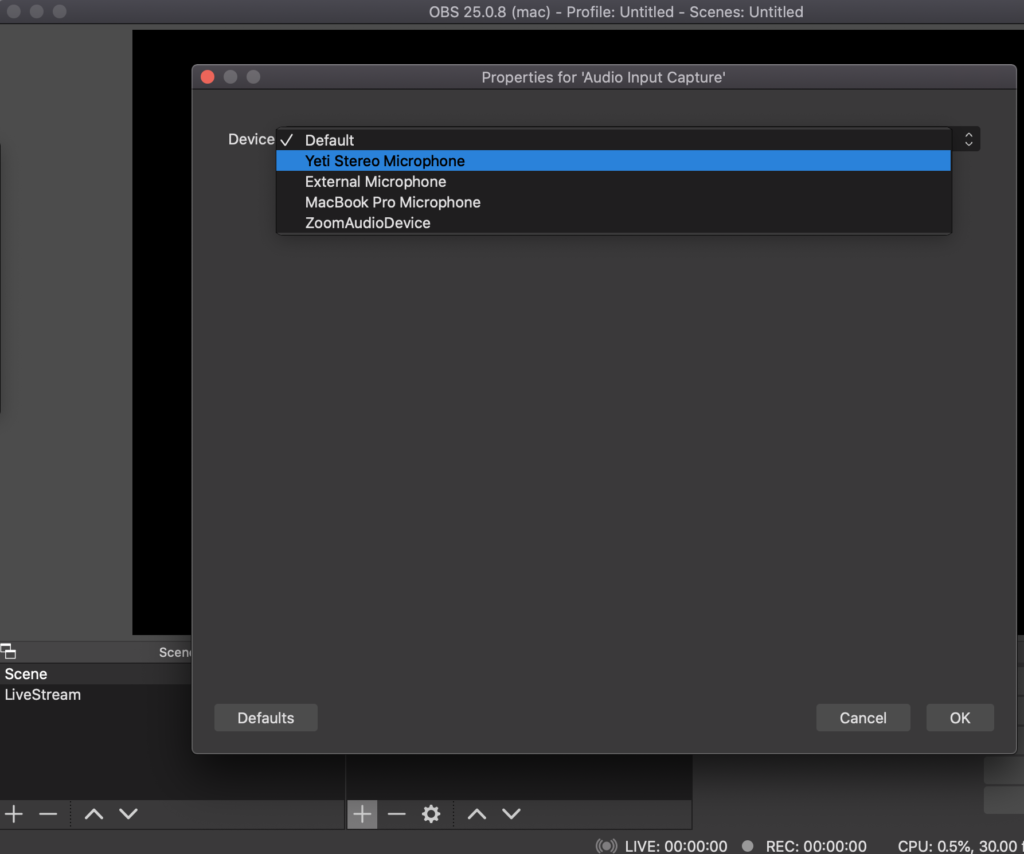
OBS > Sources > Audio Input Capture > Select Device > OK
4. Connect Your Video Device to Your Computer
Plug your video camera of choice into your laptop.
Most point and shoot cameras plug into a USB port and come with their own cable. You can also use a webcam of your choosing, or a DSLR if you have the means.
If you have none of the above, your Facetime camera is most likely the easiest to setup since its built into your laptop. It’s generally just 720p and not the best in low light.
IF you dont want to invest in a high def camera, odds are you have a high def camera on your phone!
To use your iPhone/iPad or Android:
Download an NDI App to your phone.
iPhone/iPad – https://apps.apple.com/us/app/ndi-hx-camera/
Android – https://newtek-ndi.en.softonic.com/android
Download an “NDI” plugin to OBS. –
https://github.com/Palakis/obs-ndi/releases/tag/4.8.0
NDI does not show up as a video source in OBS without that plugin. It’s a little extra work but phones for the last few years have excellent camera quality, some even with 4K. And your phone already likely plugs into USB easily.
5. Add video device as Video Source in OBS
OBS > Sources > Video Capture Device > Select Device > OK
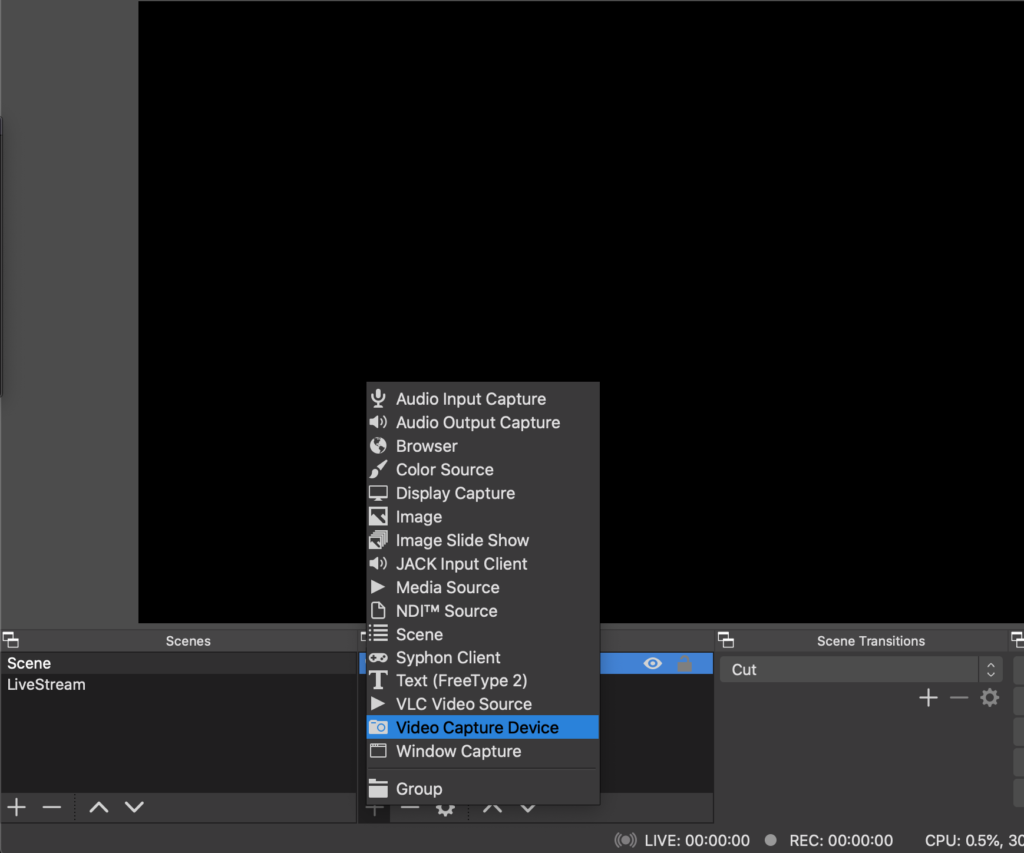
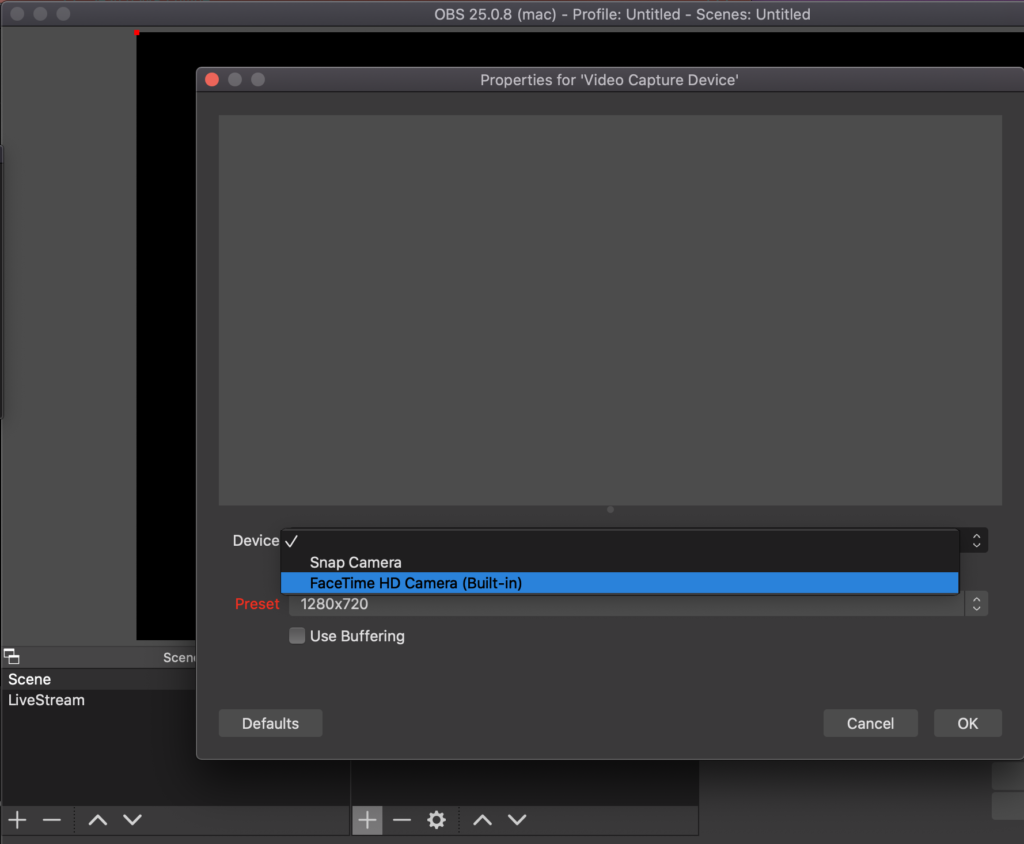
Select NDI Source if you’re using an NDI App to use your phone/tablet as a camera source.
Note: NDI acts as a video AND audio source, kind of like and HDMI. If you are using a different audio source aside from your phone or tablet, MUTE your NDI audio source either in OBS or in the app itself. Otherwise you may get doubled up audio from the two sources and things can sound weird…)
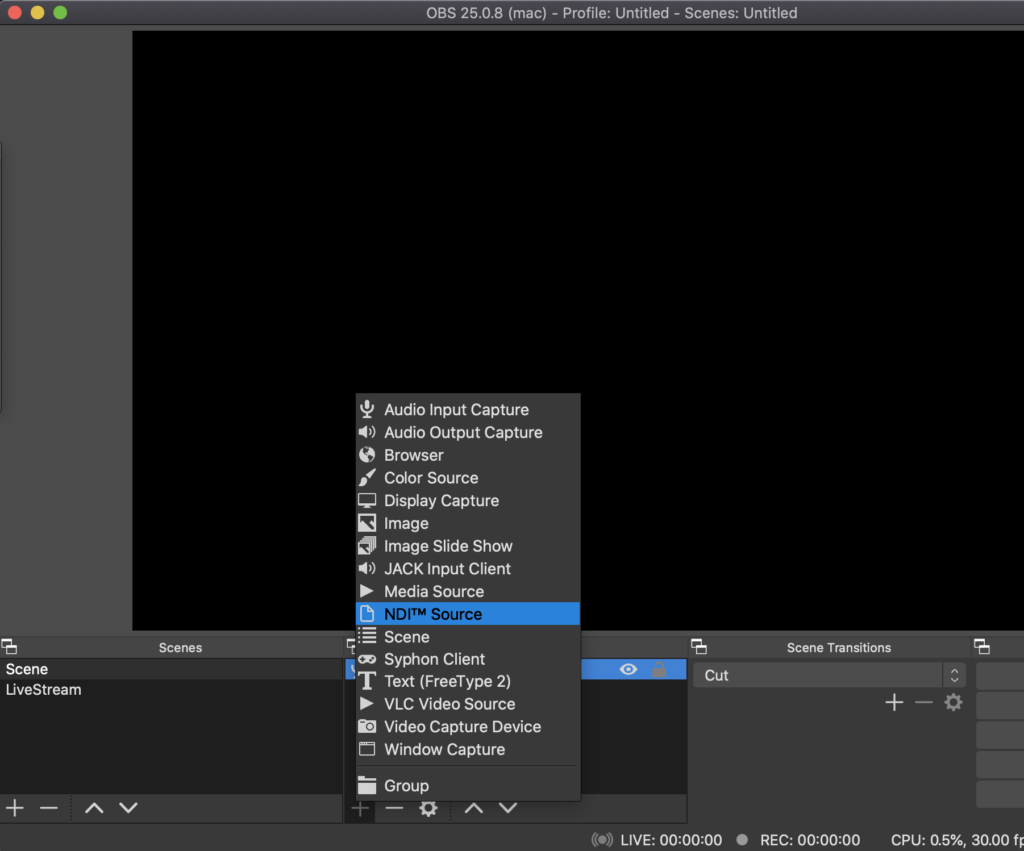
Select the device you want to assign to your video source then click OK.
6. Test audio/video
At this point, you should have audio and video sources assigned. Test it out by clicking “Start Recording” and you can watch your video recording.
Movies by default are stored at: /Users/your.username/Movies.
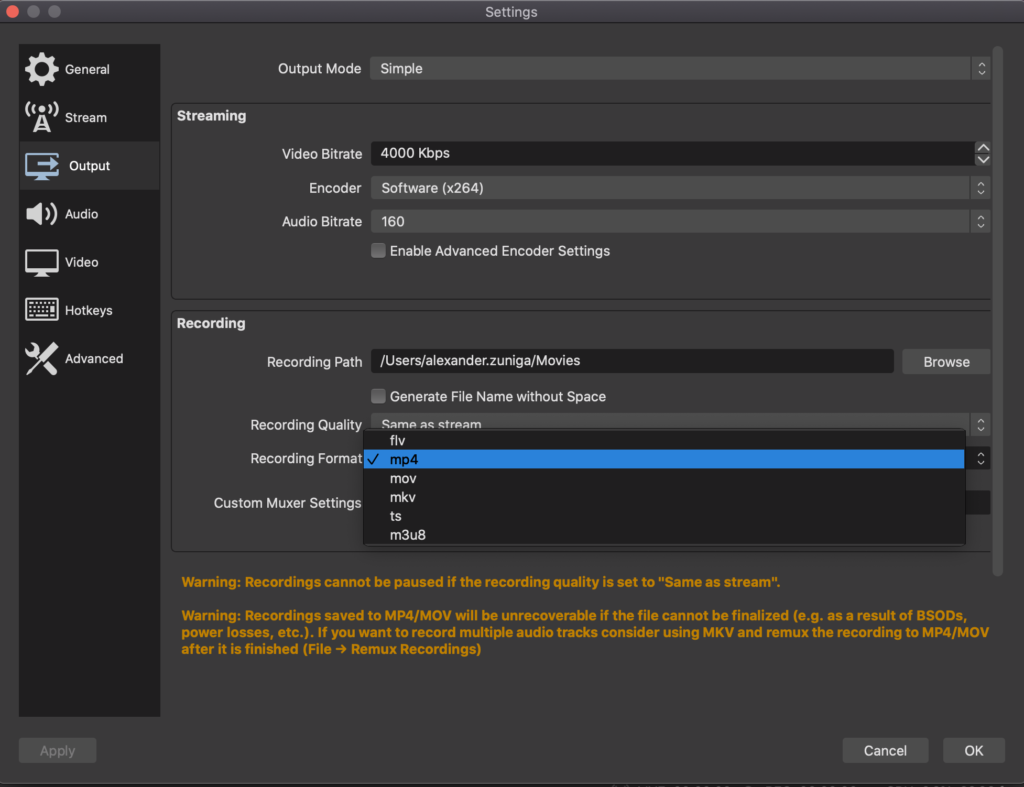
They’re also stored as a *.mkv. file which might not work with your video player of choice. To open them up in iMovie, or any general video editing application, you can change your default save to mp4.
OBS > Settings > Output > Recording Path > FOLDER_PATH
OBS > Settings > Output > Recording Format > mp4
7. Sync your audio
Most of the time, your audio won’t line up exactly with your video. You can adjust that by:
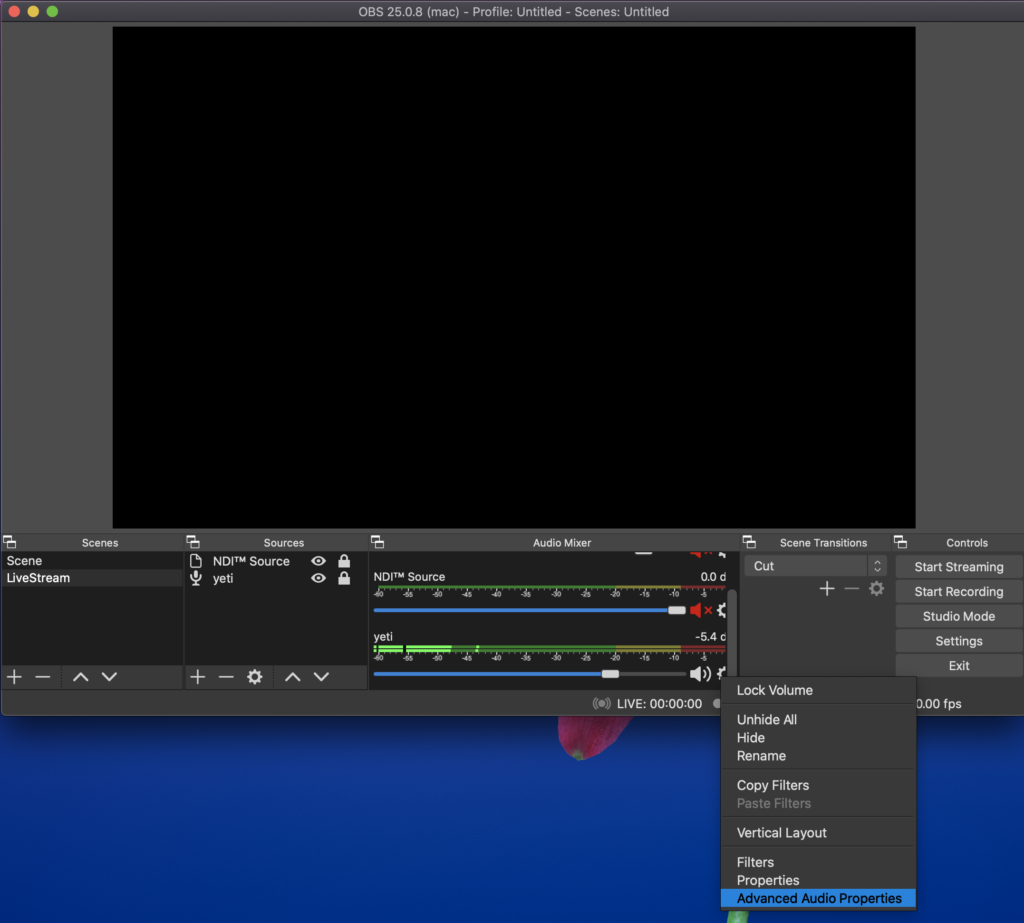
Going to the Audio Mixer
Clicking the gear next to your audio input
Select Advanced Audio Properties.
Adjust the sync offset to sync your audio and video. I had to set my Yeti Microphone as 500ms offset to get it just right.
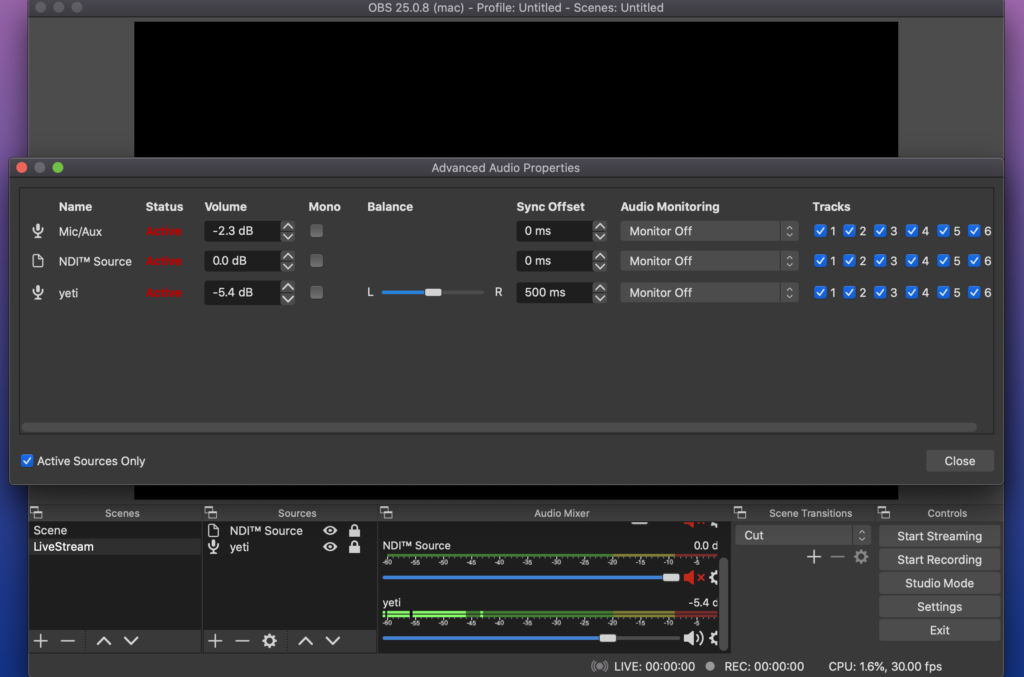
Record a video and open it up in iMovie to make sure A/V are in sync. This may take a few tries but it should be far off from 500ms-600ms.
8. Setup an account on Twitch
Go to https://www.twitch.tv/
And setup your account! Spend as much time on this as you’d like with your photo of choice, stream theme colors etc. Right now we’re going to focus on getting your stream connected.
9. Connect OBS to Twitch
HOW? Stream Key.
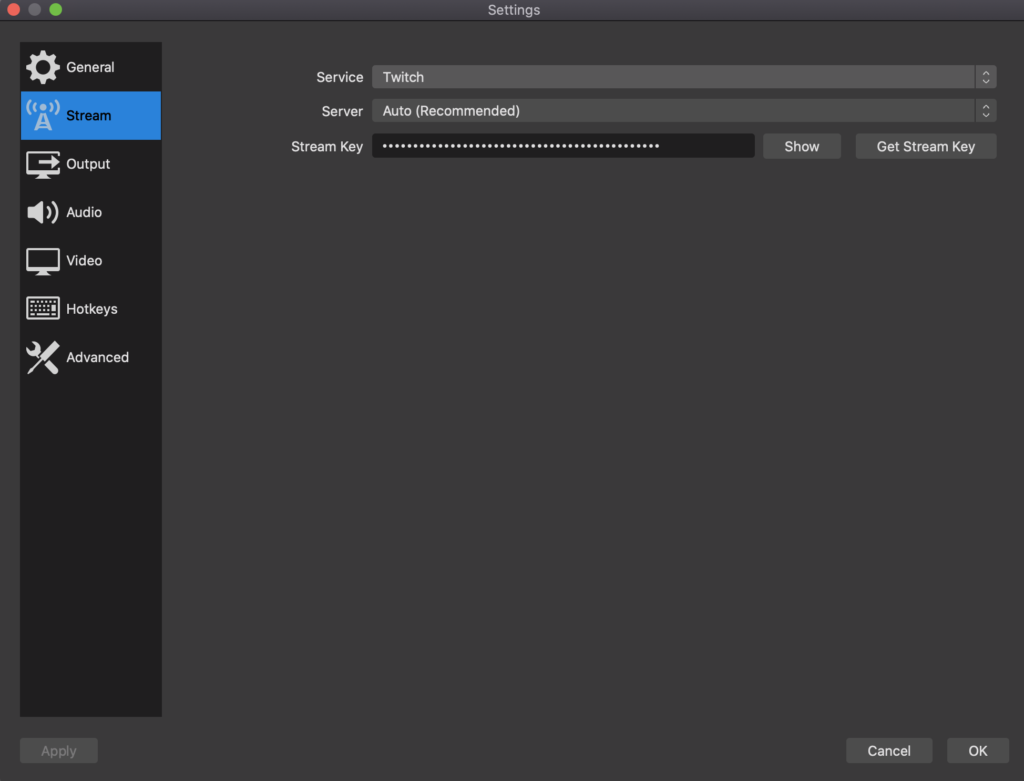
- OBS > Settings > Stream > Service: Twitch > Get Stream Key
As long as you’re logged into Twitch, this will take you to the right settings page, else;
Twitch > Settings > Channel and Videos > Primary Stream Key.
- Copy Key from Twitch and Paste into OBS, click OK.
10. Start Streaming!
OBS > “Start Streaming” (bottom right)
If all things are connected properly, you should be able to go to https://www.twitch.tv/YOUR_USERNAME and see the stream happening live.
- Don’t worry if there’s a delay between you playing and the Twitch stream. That’s normal. It takes time for things to happen. Just make sure the audio and video that are streaming to your browser are in sync.
- Mute your browser feed of the stream otherwise your microphone may pick it up and cause audio loop feedback.
THATS IT!
We want to see your talent! It’s taken me six live streams to figure all of this stuff out the hard way. Hopefully this saves you some time and frustration so you can share your mad skills with us and the WORLD! If you have any questions, hit me up (Zuniga) on Slack and if you want to get in the mix, hit up Andrei Matei! Smooth streaming y’all!
